Check out all my photos here in one place!

Tuesday, July 26, 2011

Christmas in July!

OK....are you noticing a theme here?!! It's HOT.....and I'm so ready to be past this heat wave. Oh, I know that the temperature....and the humidity....is supposed dip for the next day or so, but then the HOT and the humidity will be back. Maybe I shouldn't wish my life away, but I'm ready for Fall weather, which really is my favorite!

Last Friday night, I hosted a Christmas Card Class. I'm thinking that the heat kept most away, so, it turned out to be just one customer (after a few cancellations) and me. But that's OK because we still had fun and stamped some great cards....this is one of them, made with the brand-new, just-received-it-at-Convention set, Easy Events. It's a wonderful, all-purpose set.....it just may become my new go-to set. There were tons of amazing samples on the display boards at Convention for inspiration! Although my sample here is not really a CASE of anything I saw, it was definitely inspired by a few different things.

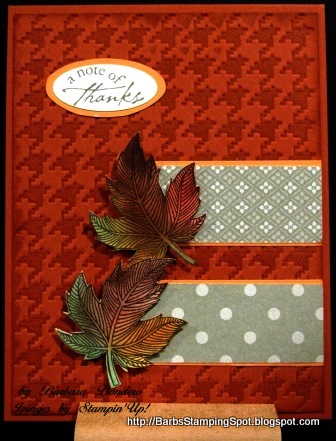
As you can see, the card base is simply Crumb Cake with a top fold. The Cherry Cobbler layer was impressed with the Big Shot and the Elegant Lines EF.....so pretty! This was all topped off with the scallop circle, which is really the larger of the 2 medallions from the Perfect Pennants Bigz Die.....so perfect behind the 2 1/2" Circle Punch layer. And of course, this is all topped off with the Very Vanilla Taffeta Ribbon at the top.

Oh! I need to tell you how I colored in the image!! Simple! Markers.....Pear Pizzazz for the leaves and Cherry Cobbler for the berries. Then to really set the image off, a little stroke of Always Artichoke marker was used on each leaf, closest to the stem, and just a dot of the White Gel Pen on each berry. Made all the difference.....just these little touches seemed to make the image come alive!!

Since I had some extras cut and ready to go, I ended up making them all for me.....so now, I've begun MY Christmas cards as well....and now have a whole basketful! (I'll still need to make more....so be on the look-out for more Christmas Card Classes coming soon.)  Bring on the COOL weather!

Stamps: Easy Events
Inks: Early Espresso
CS: Very Vanilla, Pear Pizzazz, Cherry Cobbler, Crumb Cake
Big Shot: Perfect Pennant Bigz Die, Elegant Lines EF
Misc: Very Vanilla Taffeta Ribbon, Dimensionals, Pear Pizzaz Marker, Cherry Cobbler Marker, Always Artichoke Marker, White Gel Pen

Thanks so much for stopping by and visiting today!

Posted by Picasa

Monday, July 25, 2011

The Weather Outside is Frightful......

I'm in! It's been such a long time since I've participated, but you may remember that my buddy, MaryJo has an awesome sketch challenge every week. Well, it has quieted down for just a bit the last few days and I was able to squeeze in a card with her sketch. Guess I'm way out of practice, because this one gave me a bit of trouble but as you can see, I managed to come up with something that is blog-worthy.  (Yes, I know!....that's why it's called a CHALLENGE!!)

And, YES, the weather outside IS frightful...frightfully HOT!! Although I have to admit the temperature dropped a bit today, but the humidity didn't. Stay outside for just a few minutes and you'll feel like a wet dish rag! YUK! So, even though we were all looking forward to Springtime and Summer weather for so long, I for one, am ready for Fall! So, out came one of my very favorite Fall sets, Autumn Splendor. It's perfect for this week's sketch.

Looking at my sample now, I kind of wish that I had made those strips under the leaves a bit more narrow, but that's not what I did....there's no time to re-do. So, this is it!

I have to admit that not all of this is from SU and the DSP has retired.....the DSP that I used for the strips is from a retired hostess DSP pack....in Always Artichoke. The embossing folder that I used has been in my collection for some time, but is not too different from the brand new Houndstooth EF (Item #123134) in the brand new SU catalog! (The SU version is just a bit larger so that it will do the entire front of a card....the one I own does not. So sad....that new folder is absolutely on my wish list!!

As you can see the impressions are two-toned. I brayered the folder with Cajun Craze ink and then added in the cardstock and sent it through the Big Shot. Love that look! The leaves are popped up on Dimensionals. The saying is not from SU....I was looking for something tiny that would fit in an oval or small circle....that stamp has also been in my collection for a few years! And lastly, the small oval that was used to punch out the greeting has also retired and has been replaced by another Small Oval (Item #120908)but is a different shape....a bit taller and not quite as wide. I don't think it will nest inside of the Large Oval like the old one did....but, it looks like it will be fun to use!

So that's it for me today. You can see MaryJo's sketch here.....and see who's playing along this week.

Stamps: Autumn Splendor, non-SU Greeting
Inks: Cajun Craze, Early Espresso, Peach Parfait, Cherry Cobbler, Pear Pizzazz, Always Artichoke
CS: Cajun Craze, Very Vanilla, Peach Parfait
Big Shot: Houndstooth EF (non-SU version)
Misc: Dimensionals, Sponges, Hostess Pack DSP (retired), Brayer, Small Oval Punch (retired), Large Oval Punch (I trimmed it down)

Thanks so much for stopping by and visiting today!


Posted by Picasa

Saturday, July 23, 2011

A Little Gratitude

I made this earlier today for a very special lady......the daughter of a good friend who put together our trip 2 months ago to Ireland. My bad! I never even sent her a thank you note...and everyone around here knows me as "the card lady!!" How bad am I?!! Truthfully, I'm usually a lot better than I was this time, but I came home sick, had just started a new job before I left, and it took me awhile to catch up....in all that chaos, I simply forgot. That explains, but doesn't excuse!! It really is embarassing that it took so long for me to do this for her.

Anyway, tonight was her family Christmas in July party....complete with Santa, presents, a tree and even Christmas carols...the whole nine yards. Well, almost....we also had hamburgers and hot dogs, potato salad, etc....typical BBQ food....out in the back yard in the heat....just a sultry 97 degrees tonight! And the gifts....well, the theme was "the worst thing you can find in your attic." Lots of really tacky stuff all wrapped up pretty! Truthfully, it IS fun. Well, since I saw her tonight, I really, really needed to bring her a thank you.

So, I picked up a gift certificate to slip inside this card as a small thank you from hubby and I....you see, she arranged our tour of Ireland, even though that is no longer what she really does with the company she works at. (She is in some type of management liason position, so she really went out of her way for us and set up a really fabulous trip for us. )

THIS is the card I created to go with the gift certificate....it's not a gift card holder, just a card with a gift card enclosed. This is definitely a CASE, not my original idea, it was changed up using what I had in my collection. Don't you just love that new Lace Border Punch on either side of the stamped layer?!! As you can see, the stamp used was colored in using markers to give it the multi-colored look. I'm really just so happy that Day of Gratitude is in the brand new catalog!! YIPEE! And guess what?!!.....the Big Shot was NOT used to make this card! I KNOW! Can you believe it????? (I was beginning to think I couldn't make a card without it!)

Stamps: Day of Gratitude, Warmest Wishes (retired), En Francais
Inks: Early Espresso
CS: Early Espresso, Very Vanilla, Old Olive, Peach Parfait
Markers: Cajun Craze, Old Olive, Early Espresso
Misc: Linen Thread, Doted Scallop Ribbon Border Punch, Lace Ribbon Border Punch, Cutter Kit (for distressing), Paper Piercer & Template

Thank you so much for stopping by and visiting today!


Posted by Picasa

Thursday, July 21, 2011

Sunglasses Needed!

This one is B-R-I-G-H-T....but, I'm loving the way it turned out! This week's Blogger's Challenge theme (it's good to be back!) is SUMMERTIME! Much of the country is HOT and that means we're all trying to stay as cool as possible....so flip flops are everywhere. (Check this link here.....I decorated some the other day....did you see them?)

Right now, SU has an adorable summer set available in the Summer Mini catalog, Sunny Fun, with flip flops, ice cream, and swimmers....but I don't have that. What I do have is this cute little flip flop stamp (non-SU), which I picked up a few years back at a craft store. This is the first time I've used it....how cute, right?!!  Hmmm...wonder what I was waiting for!!

I've set aside and packed up for a cards class that will take place this evening and I really didn't want to dip into those supplies, so I felt a little limited working with whatever was left in my stamp studio. This card didn't come out quite the way I might have normally made it, but I've fallen in love with it. Maybe I should try packing up many of my supplies more often, huh?!!

The card size is unusual for me....used the Scallop Square die for the card base.  I've been dying (pun intended!) to try this for a long time and this was the perfect card to try it with.  Just fold the cardstock in half and lay it in the die so that the one side doesn't cut away. Then just the cardfront was placed in the Perfect Polka Dots EF....the perfect match to those cute little summer sandals! Speaking of the flip flops, check out the flower centers.....added the Flower Brads in the center in Daffodil Delight, which matches the card base and a Basic Rhinestone was added in the center of each....I believe I used the mid-size. The ribbon on the side is now retired, but still matches the polka dot theme going on here.....in Melon Mambo. A bit of Tempting Turquoise sets it all off.   So, now I'm dressed for the weather....just trying to stay cool.

Stamps: Flip Flops--non SU, Short & Sweet
Inks: Melon Mambo, Tempting Turquoise
CS: Daffodil Delight, Whisper White, Tempting Turquoise
Big Shot: Scallop Square Die, Perfect Polka Dots EF, Scallop Squares Duo
Misc: Flower Brads in Daffodil Delight, Basic Rhinestones, Melon Mambo Polka Dot Grosgrain Ribbon (retired), Word Window Punch, Dimensionals (under flip flops)

This post also fits the Challenge over on Hand Stamped Sentiments....haven't played along with them in a long time!  Be sure to hop on over and check out their blog, too!

Thanks so much for stopping by and visiting today!


Posted by Picasa

Wednesday, July 20, 2011

Another Convention Swap!

This one was such fun to make....but, as you can see, there's not much stamping going on! But, the Big Shot AND various punches were plentiful!! Super simple, cheerful, and kinda bright. The ladies who swapped with me seemed to really like this one.  Although I cannot claim this original idea as my own, it is really a compilation of a few ideas I've seen floating around.

So, how did I create this? Well the packages are simply squares created with the 1 1/4" Square Punch and run through the Big Shot in the Perfect Polka Dot Embossing Folder. And those little "bows" on top?....they are none other than the flower from the Blossom Bouquet Triple Layer Punch...the flowers were simply cut in half. The Basic Rhinestones just set everything off....the mid size was used.

The red zig zag was created by using the Tasteful Trim Bigz Die.....the perfect solution when you might be limited on the right color ribbon (which I was)! This was the only really tricky part to making this card....gluing the zig zag strip down. Found that if I used dabs of our Multi Purpose Liquid Glue along the back the strip stayed where it should......you see, I tried the 2-Way Glue Pen, and they simply fell off; and SNAIL made a mess since the strip is so narrow.

The opening in the yellow card background was created by using the Curly Label Mover & Shaker....just place the shape in the bottom corner of the metal plate and roll through. It even gives you the stitched outline for a little more fun! AFTER creating the window, I stamped the greeting and added another Basic Rhinestone....this time one of the smallest size....to the star/dot over the "I."  So fun, right?!!

Stamps: Word Play
Inks: Tempting Turquoise
CS: Whisper White, Daffodil Delight, Real Red, Tempting Turquoise
Big Shot: Tasteful Trim, Curly Label Mover & Shaker, Perfect Polka Dots EF
Misc: Basic Rhinestones, Multi Purpose Liquid Glue, Blossom Bouquet Triple Layer Punch

Thank you so much for stopping by and visiting today!

Posted by Picasa

Tuesday, July 19, 2011

Sweet Little Flip Flops

Not sure how it is where you live, but here it is HOT!...and hot weather means flip flops are now  my favorite shoes!  These are some I picked up somewhere last year in a clearance bin.  When I saw them, I just knew I could fancy them up, which  is exactly what I recently did.  So quick....so easy!

Just ran some fun foam sheets in white through my Big Shot, using the Daisy Die, and added a now-retired Corduroy Button in Summer sun.  The most difficult part was attaching to the sandals.  I tried Glue Dots....nope, they fell right off!  Then I tried Crystal Effects.....well, they stayed on longer, but still fell off.  So, then I got out my trusty Crop-a-Dile and made a hole and pushed the "feet" of the buttons (they were really like big brads) through the hole and then pulled out a pair of pliers to really bend the feet up so they didn't bother me while wearing them. Aren't this just so FUN?!!  Well, since I now had them perfected, I was off and running!

Just a few days before I left for Convention, I was shopping in one of the big box stores and found bins of plain flip flops for just $1 each....so, you KNOW I went home with a bunch!  The next 2 pair I made for my Convention Roommate....she loved them!  Again, fast and easy!  This first pair were secured to the strap of the flip flop by punching 2 holes, again with the Crop-a-Dile and then tying with Whisper White Baker's Twine....LOVE that stuff!  This time, I used the Fun Flowers Bigz Die....can you see that the orange layer has been impressed by using my Square Lattice Embossing Folder?  Really changes the feel of the Fun Foam, but works like a charm!!  I was going to use a real button, but didn't have the right color, so instead, there is a faux button created by using the Sweet Buttons Embosslit. 


That pair came together so quickly, that I decided to create another pair for her.....this time using the Beautiful Butterflies Bigz Die.  Both layers were put through embossing folders, but in this case, neither is a SU embossing folder.  To secure the butterflies, a pair of Antique Brads were used and a medium size Basic Pearl was added to the center.  The last photo shoes a close up so that you can really see the impressions made by the embossing folders.

(The close up photo has some shadows in it....sorry for the poor quality.  It almost looks like I've shaded with ink.....no ink was used in these projects.) 


I'm not going to add a materials list because I've already mentioned everything used above.  I hope I've inspired you to create some new sandals of your own....if you decide to make some, please share and if you have any questions, please let me know! 


Thanks for stopping by today!!

Saturday, July 16, 2011

Convention Swaps are Here!

Hello! I'm here in Salt Lake City at the SU Convention! As always, it is fabulous!! Lots to learn, lots to see, new products to hear all about, lots of great ideas.....wait till you see some of the great new stuff coming our way!  But, the best part? Seeing and meeting with so many friends. You see, there are lots of online friends that I only get to see here! So, I'm here in Salt Lake with about 3,000 of my "closest" stamping friends! LOL Really, tho, I am here with people that I really love to be with....and stamping with them. It just doesn't get better than that!

So, I've shown you a couple of swap card that I've made that didn't come with me....maybe you'd like to see what I brought to swap? This is the first of the 4 different ones made. Doesn't it looks complicated? Believe me, when I tell you that it is E-A-S-Y!! Honest! Here's how......

Simply stamp the floral spray in Wild Wasabi onto a piece of Whisper White CS. Then decorate with the punched flowers. They were created using the little flower punch from the Itty Bitty Punch Pack....in Pink Pirouette, Pretty in Pink, and Regal Rose. Just a little dab of SNAIL on back of each flower is all that is needed. Then pass it through the Big Shot using the Square Lattice EF.....haven't seen me use that one in awhile, have you?!!  Yes, it's STILL a favorite! The remainder of the card should be easy for you to understand.....but one last thing I need to share is that the very last step should be to add the pearls. Believe me when I tell you that it's just so much easier to add them last then to try to adhere that whole section with the pearls already added....ask me how I learned this!!

Stamps: Thoughts & Prayers
Inks: Wild Wasabi
CS: Wild Wasabi, Whisper White, Pink Pirouette, Pretty in Pink, Regal Rose
Big Shot: Square Lattice EF
Misc: Pinking Hearts Border Punch, Itty Bitty Punch Pack, Basic Pearls

Thanks so much for stopping by today!
Posted by Picasa

Sunday, July 10, 2011

I Stink You're Sweet

This set, Pun Fun, has just retired.....it has the cutest images! Oh!....I'm going to miss it....I think. You see, although this set is no longer available, SU has replaced it with another set that is versatile and just as wonderful, but the images, of course, are different. (Check out Easy Events, Item #116958(Wood) or #123225 (ClearMount), on Page #57.) BUT, I promised my 10 year old niece a card and this little stamp was just the perfect thing!!

You see, she's now a junior stamper and has sent me a couple cards, so I really needed to send her one, too! Not sure if she received it before leaving for vacation, but I hope she likes it. This is all SU, although much as been retired....the stamp, the background paper, the ribbon, and the Pure Color Pencils, are all gone, but not forgotten!

As you can see, it's the same layout I used for a recent swap and post.....this began with an entirely different idea, but as often happens, evolved into this. And, I'm loving it!!....you may be seeing this layout again before too long.

So, the deets....

Stamps: Pun Fun*
Inks: Basic Black
CS: Pretty in Pink, Basic Black, Whisper White
Big Shot: Perfect Pennants
Misc: 2 1/2" Circle Punch, Black Gingham Ribbon*, Pure Color Pencils*, Designer Series Paper Pack/Hostess in Regal Rose, Basic Pearls, Pretty in Pink & Certainly Celery Markers, Gamasol (non-SU)
*Retired

Thank you so much for stopping by today!


Posted by Picasa

Friday, July 8, 2011

Bloggers' Challenge -- Floral Frenzy

It just so happens that I was about to post this card and realized that it also fit this week's Bloggers' Challenge theme. You see, this was my swap card in the GoDiva swap group last month featuring new catalog items. I've said it before, but I really need to say again that the ladies that are a part of that group are so very talented and truthfully, I'm beyond astonished to be a part of stamping royalty....because that's what those ladies are! Since all participants received their swap cards last week, it's time to let you all in on a bit of what I've been up to.

The flowers shown here are from the new Hostess set, Simply Soft....a true 2-step stamp set. The outline of this flower were stamped in Basic Black, the second stamp fills in the flowers and was stamped in Wisteria Wonder, one of the fabulous new In Colors now available, and there's a dab of Dazzling Diamonds in the center, or on the stamen of each flower to just set it all off. Oh!...and check out that background! Is it not luscious?!!....I'm in love! A brand new Letterpress Plate, called Fancy Fan created this.....I inked it up with White Craft ink and sent it through my Big Shot.

Another new item used is the scallop circle....a new Bigz Die called Perfect Pennants. This new die has a couple cool medallion-type and 2 different sizes of pennants that can be rolled out. For this card, the medallion is the perfect backdrop of the punched circle.

Hope you'll join me in checking out the blogs of all those that join in our Challenge this week.  You won't be sorry.....also a talented group! 

Stamps: Simply Soft
Inks: White Craft, Basic Black, Wisteria Wonder
CS: Whisper White, Elegant Eggplant, Pear Pizzazz
Big Shot: Fancy Fan Letterpress Plate, Perfect Pennants Bigz Die
Misc: 2 1/2" Circle Punch, Dotted Ribbon Scallop Border Punch, Pear Pizzazz Marker, Whisper White Taffeta, 2-Way Glue Pen, Dazzling Diamonds Glitter

Thanks so much for stopping by today!


Posted by Picasa

Bold Summer Blossoms

This card is from about a month ago....you see, I made it for one of MaryJo's Challenges, #177 to be exact. I made it late in the week and then ran out of time to post it....then I got sick, life got in the way, computer died, had oral surgery, blah, blah, blah....... Anyway, I'm kind of partial to this little card....and thought it was about time to share! Made with a fun Summer Mini Catalog set, Bold Blossoms.  (NOT included in the new SU catalog, so it won't be around too much longer.)

There are a few retired items on this card.....the greeting, which is an older, long-gone hostess set; the ribbon, which was current back when Riding Hood Red was an In Color; and the mini brads, which are Ruby Red and seem to match perfectly! SU brads are the best because even when they are supposed to be a certain color, they seem to match so much more!....anyway, all those items are now retired.

A bit of texture and lots of punching going on here......the background was created with the Perfect Polka Dots EF. I'm just so happy that that one is still around....it's just perfect (pun intended!! LOL) with so many things. The flowers were created with the fabulous, Blossom Bouquet Triple Layer Punch, the 3/4" Circle Punch, and the little 4-petal punch from the Bitty Shapes Punch Pack....and, of course, a mini brad. The butterfly was simply stamped, cut out and placed on a Dimensional.  Don't those colors just scream summertime?!!

Stamps: Bold Blossom, Warm Wishes*
Inks: Old Olive, Riding Hood Red
CS: Whisper White, Daffodil Delight, Peach Parfait
Big Shot: Perfect Polka Dots EF
Misc: Riding Hood Red Taffeta Ribbon*, Cherry Cobbler/White Baker's Twine, Dimensionals, Modern Label Punch, Bitty Shapes Punch Pack, Paper Piercer & Template
*Retired

Thanks so much for stopping by and visiting today!

Posted by Picasa

Thursday, July 7, 2011

One-Layer Swap

Last month I participated in a swap with an online group. Fun ladies, and so very talented! The challenge was to create a card using just ONE LAYER. Hmmm! Sounded like fun...but wasn't quite as easy as I had thought it would be....but, I persevered, and this is what I came up with.

As you can see, the card is Whisper White and the bottom portion of the cardfront was impressed with the Perfect Polka Dots EF. Next, I stamped the trees from Trendy Trees...hadn't used that one in a long time! Happy to say, that it's in the new catalog. Next, I created a rectangular mask from scrap paper and sponged over the trees and then outlined with a Early Espresso Marker. The greeting was added and then the ribbon.

What do you think? For a simple card with no layers, it has a lot going on, don't you think?!! Why not try making a one-layer card today?...and don't forget to share!

Stamps: Trendy Trees, Fabulous Phrases
Inks: Old Olive, Early Espresso, Certainly Celery (for sponging behind trees)
CS: Whisper White
Big Shot: Perfect Polka Dots EF
Misc: Sponge, 1 3/8" Square (for creating rectangle in scrap paper), Early Espresso Marker, Wide Old Olive Grosgrain*, Crop-a-Dile (for creating hole for the one-hand "bow"
*Retired

Thanks so much for stopping by today!

Posted by Picasa

Wednesday, July 6, 2011

Another Convention Reject

It's good to be on my computer again! You see, I've been missing because my computer suddenly decided to be uncooperative about 1.5 weeks ago and I've been without ever since! Boy, can I tell you how disconnected I felt?!!

But, being without a computer gave me extra time to stamp; and with Convention fast approaching, I really needed to spend time stamping away on my swaps! This is another reject. Although I liked it, it just didn't send me. It's OK, but something seemed to be lacking. I am happy to say, that I did come up with the much-needed designs that I will be sure to share soon. But in the meantime, I have a few other goodies to show you....this is one of them.

You see, I was invited into a swap group about 2 years ago....and these ladies are truly amazing! They give creativity a whole new definition!!...and they make me really branch out creatively as a result. So, this is one I came up with in trying to design my swap for this fabulously talented group. Nice, but in this case, not great.

This showcases the brand-new Hostess stamp set, Simply Soft, a true traditional 2-step set...and it's flowers! What's not to love?!!....IMHO, this is the must-have set this year!!  This was stamped onto a round piece of Whisper White that had the faux Mother of Pearl technique....see that background? So easy and fun! Simply scrunch a small piece of Saran and dab it into a very small amount of Frost White Shimmer Paint and then dab onto the Whisper White paper and allow to dry...this doesn't take very long. Then stamp over top.

Lots of new goodies used here...see below for the deets:

Stamps: Simply Soft, Happiest Birthday Wishes
Inks: Basic Black, Chocolate Chip, Bashful Blue
CS: Whisper White, Soft Suede, Bashful Blue, Marina Mist
Big Shot: Fancy Fan Impression Plate, Scallop Circle #2
Misc: Frost White Shimmer Paint, Circle Scissor Plus, Blossom Bouquet Triple Layer Punch

As always, Thank You so much for stopping by today!

Posted by Picasa

LinkWithin

Blog Widget by LinkWithin