Check out all my photos here in one place!

Monday, March 14, 2011

MaryJo's Monday Challenge #165


This is my version of Mary Jo's sketch this week....a little different, definitely a variation. But, although it's very simple....and has almost no stamping, I love it and really wanted to share!

I'm trying to decide if this is Spring-y or Summer-y...what do you think? Those daisies from the Daisy Die....I used the smallest....are just so dang cute. And I thought they'd be perfect for this week's Challenge. Everything on this card is from SU, but, the centers of the flowers are the now-retired Chocolate Chip buttons. I still have a lot of those....and still love them....wish they were still in the SU line....and thought they were perfect for the flower centers.

The Chocolate Chip rick-rack-shaped strip across the card was created with the new Tasteful Trim die....well, it's new for me. It was released in the Holiday Mini, and is still available. Isn't it fun?!! As you can see, I added it to the Whisper White background and then impressed it all in the Perfect Polka Dots Embossing Folder.

Then the flowers were simply added in on Glue Dots (I still have some of the larger glue dots in my stash....and these worked great. However; I'm certain you could use a few Mini Glue Dots or Dimensionals.) I just added in a little greeting, in keeping with the simplicity of the overall card.

So, that's my submission for Mary Jo's Challenge this week.  It's good to join in.....not sure what my problem was, but for the last few weeks, every time I tried to create a card with her sketch of the week, it just went so very wrong!  Thanks so much for stopping by today!

Stamps:  Short & Sweet
Inks:  Chocolate Chip
CS:  Whisper White, Daffodil Delight, Chocolate Chip
Misc:  Daisy Die, Tasteful Trim Die, Perfect Polka Dots Embossing Folder, Big Shot, Word Window Punch, Pop-Up Glue Dots*, Chocolate Chip Corduroy Buttons*

Posted by Picasa

Friday, March 11, 2011

Bloggers' Challenge -- Happy Birthday!

This week's theme, as you may have already guessed, is a birthday theme. Lisa is our list mom (she puts out the Challenges to us) has a birthday coming up....so, this is kind of like a mini birthday party for her! Happy Birthday, Lisa!! (Hope it's a great one!)

This card was a fun one to make...one I made about a month ago for the birthday of a very good friend.  I took my colors for the card from this DSP, Sweet & Sour Specialty paper.  The DSP was layered onto a base of Rose Red CS.  Then there's that scallop square created by the Scallop Square Duo Die and my Big Shot, topped with a couple of layers of CS...can you see them?  A bit of Pink Pirouette shows through under the Whisper White layer, but on top of the Pumpkin Pie. 

And how cute is that cupcake?  It's from the fun little set in the Occasions Mini, Create a Cupcake and the matching punch.  I was so happy with the way this card came out...but, it definitely was inspired by this one here.  Now, if you've clicked on that link and you are a SU Demonstrator, you should be able to click right over, but, if you are not, you cannot view the inspiration sample (so sorry!), as it is located on a demo-only site.  (Another reason you NEED to become a SU demo!!)

Oh, and that bow...made with the luscious Whisper White Satin ribbon....was created with the Bow Easy (a non-SU item)....something I received as a gift and makes the best, most perfect bows!  Well, that's it for today.  Thank you so much for stopping by today...hope you enjoyed today's share.

Stamps:  Create a Cupcake
Inks:  Rose Red, Pumpkin Pie, Pink Pirouette
CS:  Whisper White, Rose Red, Pumpkin Pie, Pink Pirouette
Misc:  Build a Cupcake Punch, Word Window Punch, Big Shot, Scallop Square Duo Die, Perfect Polka Dots Embossing Folder, Sweet & Sour Specialty DSP, Whisper White Satin Ribbon, Mini Glue Dots (for holding the bow on), 2-Way Glue Pen, Dazzling Diamonds (on the frosting)


Posted by Picasa

Friday, March 4, 2011

Bloggers' Challenge -- Peach/Green/White

OK...your screen is NOT off....your eyes are NOT deceiving you!  I goofed....so, just imagine that the So Saffron color is Peach Parfait instead.  (I don't know where my head is at these days!!)   I was thinking peach when I created this card this morning, but I reached for So Saffron instead. I'm really having a "dumb blonde day" today.....hope the other Bloggers' don't mind my mistake!!

Anyway, I'm in love with Wild Wasabi these days (did you notice?!!...I've used it in a few recent postings), so this is presently my "go to" green color.  IMHO, it's just such a lovely, Spring-like green.  And to think I wasn't very impressed a couple of years ago when this was an In-Color!  Hmm....guess we all evolve with time, right?!!

Anyway, I wanted to keep this card kind of simple...it began with an entirely different layout in mind!  (That process of evolving!)  There's actually quite a bit going on here, but since the backgrounds are color-on-color, it doesn't really look too busy. 

Can you see the die cut Lattice background?  Well, originally, I thought that it would be perfect for the Inlaid Embossing technique.  And quite possibly, it would be....IF it wasn't the same color as the background.  Since the die cut piece is the same color as the card background, it simply disappeared!  Even in real life, I could barely see it....and that simply will not do!!  You see, with all those tiny sections, adhering the cut piece to the embossed background is a bit tricky, so I figured the inlaid process would take care of that....but, NOPE, that didn't work at all!  Guess, it needed to be a contrasting color. 

So, once the background was fixed, a circle was die cut from the Circles #2 die (it's the 3rd largest size)...but, if you are lucky enough to own the new 2 1/2" Circle Punch, that would work as well.  (Mine has been on backorder!)  Then the circle was simply stamped in Wild Wasabi and the flowers were added in.  Aren't those dimensional flowers....created with the Flower Fusion Sizzlet...just adorable?!!  The centers are  Bitty Buttons tied with a bit of Linen Thread. 

All in all, when I worked out the kinks, it was a very fun card to create....and even if I used the wrong color scheme, I love the fresh, Spring-like look!!  (Oh!  I hope Spring comes soon...don't you?)

Stamps:  For All You Do, Because I Care (greeting)
Inks:  Wild Wasabi, So Saffron, Basic Gray
CS:  Whisper White, Wild Wasabi, So Saffron
Misc:  Big Shot, Lattice Die, Square Lattice EF, Circle #2 Die, Flower Fusion Sizzlet, Bitty Buttons, Linen Thread, Mini Glue Dots, Modern Label Punch, Large Oval Punch, 1 1/4" Round Punch, 1/8" Taffeta Ribbon in Daffodil Delight

Thanks so much for stopping by today! 

Wednesday, March 2, 2011

UhOh! Missed the Mark Again!

Well, with all the "time off" from stamping lately, I seem to be a bit rusty. Oh, I'm not unhappy with this card, but you see it was supposed to be for MaryJo's sketch from a week ago Monday. Problem is, that stamped focal point ended up way too large for the layout. Since I liked the way the images came out, I didn't want it to go to waste and that's how this card was created!
The stamped image was created by using markers and double stamping along the bottom....in other words, there's second generation stamping along the base. The way the greens all work together is really pretty, don't you think?...so nice and soft....AND Spring-y! Those little pearls are just like the "icing on the cake....you know I love them!
Although I like the stamped panel, when I was putting this card together, it just seemed to need a little something extra. So, that's how the 1/2 circle and flower came to be used. The 1/2 circle is really a 1 1/4" circle punched, folded in 1/2 and wrapped around the layers. Then a little Fleurette was added....can you see it's the double Fleurette? So cute...and it looked perfect in this plain, white, original color....no need to dye it or anything. Truthfully, I haven't used many of these cutties, but now that I have used one on this card I may crack out these babies any use them everywhere! OK....just kidding...but I do love how it looks on this card!
The Fleurette was topped with an Antique Brad and....can you see it?...another mini Basic Pearl! This, of course, is all set against my very favorite impressed background.....Mellon Mambo impressed with the Square Lattice EF. The simple little oval with the greeting (which is an older, now-retired SU set) is simply unframed, but on Dimensionals.
What do you think? A bit bright, but, I'm loving it. Can Spring hear us calling? March is upon us....Spring can't be far behind!
Stamps: Just Believe, Warmest Regards*
Inks: Mellon Mambo, Wild Wasabi
CS: Whisper White, Wild Wasabi, Pear Pizzaz, Mellon Mambo
Markers: Pear Pizzaz, Mellon Mambo
Misc: Large Oval Punch, 1 1/4" Round Punch, Basic Pearls, Dimensionals, Big Shot, Square Lattice EF, Fleurette, Antique Brad
Thanks so much for stopping by!Posted by Picasa

Thursday, February 24, 2011

A Simple Thanks

This card is really a simple one (much more my style than my previous post, which you can see here)......and one I made recently for a thank you card. (Yes, I really did send it!) I'm loving the Poppy Parade and Old Olive color combination. Paired with a bit of black it really pops. AND this one uses my very favorite stamp set, Friends 24-7.

Although I adore this stamp set, I actually have rarely used this particular stamp. My favorite stamp in the set is the flourish...that's one I use most often!! Anyway, the image was stamped in StazOn Jet Black, then colored in with markers and a Blender Pen. This was stamped and colored on Whisper White CS. I really tried to be careful, but to get the intensity of color, the paper kind of pulled and roughed up. So, to counter-act this, I then colored over the entire image with the Versamarker and embossed with Clear Embossing Powder.....but, I know that you cannot see that. It really kind of makes this card more special.

As you can see, there are a few layers to really set off the embossed floral image and raised on Dimensionals. This is all set against the Poppy Parade background that was impressed with the wonderful new (it's in the Occasions Mini) Framed Tulips EF.

Stamps: Friends 24-7, Teeny Tiny Wishes
Inks: StazOn Jet Black
CS: Whisper White, Poppy Parade, Old Olive
Markers: Poppy Parade, Old Olive
Misc: Blender Pen, Versamarker, Wide Basic Black Grosgrain, White Button from the Neutrals Designer Pack, Linen Thread, Small Oval Punch, Large Oval Punch, Big Shot, Framed Tulips EF
Thanks so much for stopping by today!

Posted by Picasa

Tuesday, February 22, 2011

Spring is Coming.....Really!

This began as my submission to MaryJo's Techno Lunchtime Sketch Challenge for last week. Well, I'm too late for that Challenge, but it turns out that I really didn't follow the sketch. You see, the stamped floral image portion turned out too large for the layout. MJ's sketch was actually a square card....but, I find them difficult to store and they cost more to send, so I generally stay away from making them. Since I didn't use the square size for this, it really didn't layout as I had hoped, and I came up with this instead.

I'm actually not sure how I feel about this card....it's a bit busier than my usual style, but it is kind of Spring-y. Since it snowed AGAIN today and I'm really looking forward to Spring, maybe this will bring it on a little sooner!
Truthfully, I always seem to have trouble building a "garden" look, so the stamped portion was inspired by a card I saw somewhere by Carol Taggert, although it is somewhat different. As you can see, the set used is Awash with Flowers, a 2-step set. I believe Carol stamped the outline images and watercolored them in....her card is truly beautiful. Since I used stamps for the inside image, the panel seemed a bit stark when done. So, to soften it a bit and blend the greens at the base, I sponged around the edges and brought the color in a bit around the flowers. I paired Wild Wasabi and Pear Pizzaz together, and I'm really happy with that combo....I'm definitely going to use that together again.
Oh, and not sure if you can tell, but the stamped insides of the flowers features the Rock 'n Roll technique. If you click on the photo of the card, it will open larger and you can see more detail....and you may notice that the flowers are 2-toned.
Stamps: Awash with Flowers
Inks: Basic Gray, Pear Pizzaz, Wild Wasabi, So Saffron, Peach Parfait, Pretty in Pink, Rose Red
CS: Whisper White, Pear Pizzaz, So Saffron, Paper Pack DSP*
Misc: Pretty in Pink Narrow Grosgrain Ribbon, Linen Thread, Neutral Button from Designer Button Pack, Framed Tulips EF, Big Shot, Martha Stewart Punch, Mini Glue Dots
Thanks so much for stopping by and visiting today!

Posted by Picasa

Monday, February 21, 2011

Bakery Window

My birthday was early this month....but since I was not feeling well for much of the last few weeks, I'm kind of calling it my un-birthday. Unfortunately, the calendar still shows I'm another year older...oh, well!

Well, I happen to share the same birth date with my good friend, June, a sister demo. So, of course, she gave me a really great WOW card to commemorate my un-birthday! It's such a fabulous card, that I just had to share with you!! Check out all the detail.....don't you just love that awning? It was created by adding punch outs created with the Word Window Punch and creasing the CS. It showcases a now-retired stamp set, The More the Merrier, a Hostess set from last year's catalog.

As you can see, the bottom portion was impressed with my still-favorite embossing folder, Square Lattice. The greeting is from Occasional Quotes, a hostess offering from the current catalog. So....how cute is this card?!!

Stamps: The More the Merrier, Occasional Quotes
Inks: Basic Black (cupcakes), Early Espresso
CS: Pretty in Pink,Shimmery White
Misc: Word Window Punch, Large Oval Punch, Scallop Oval Punch, Scallop Edge Punch, Square Lattic EF, Big Shot, Pretty in Pink Marker

Thanks so much for stopping by today...hope you enjoyed your stay!

Posted by Picasa

Sunday, February 20, 2011

Beautiful Butterflies

Isn't this gorgeous? OK....I know I'm bragging! But, when I was finished making this card, I was just amazed at how simple, but elegant it was when completed.

The background of this card is simply a base of folded Crumb Cake cardstock...no embossing, it's just plain and simple! The scallop square was created with the larger of the 2 scallop squares in the Scallop Square Duo Die (still available!) and then a stamped layer of Very Vanilla is over top. The stamp used is Fine Flourishes.....a lovely smaller, background stamp. The double winged butterfly was made using both the Beautiful Butterflies Die (Crumb Cake layer) and the Beautiful Wings Embosslit (Baja Breeze layer). Before mounting the smaller butterfly layer, I gently folded in half, so that it would have more dimension....and the raised portion was also gently sponged with Very Vanilla Craft Ink, which makes those little raised curly Qs POP! After mounting, some Basic Pearls (LOVE those!!) were added in, and the butterfly really came together.

I'm also in love with all the new seam binding that SU is carrying....on this card, I wrapped the front of the card in Crumb Cake Seam Binding. The bow has one of the cute little buttons from the Neutrals Designer Pack, a smaller bow created with Linen Thread and topped with a small Basic Pearl. I guess this card is a perfect example of "less is more!"

Stamps: Afterthoughts (Hostess Level 1), Fine Flourishes
Inks: Soft Suede, Very Vanilla Craft Ink
CS: Crumb Cake, Baja Breeze, Very Vanilla
Misc: Big Shot, Scallop Square Duo, Beautiful Butterflies, Beautiful Wings Embosslit, Basic Pearls, Crumb Cake Seam Binding, Neutrals Designer Button, Linen Thread, Mini Glue Dot (to hold bow on)

Thanks so much for stopping by today!
Posted by Picasa

Saturday, February 19, 2011

Bloggers' Challenge -- Embossing

That cold I managed to get, paired with a sinus infection had me down and out....if you have been "lucky" enough to have had that cold yourself, you know just how awful it can be! I'm sorry I've been away for awhile, but I just didn't have the energy to come up with a creative idea...or get to my stamp studio...or even post anything! Fortunately, I'm feeling soooo much better....but it took 3 weeks! So, I'm a bit behind......YIKES!

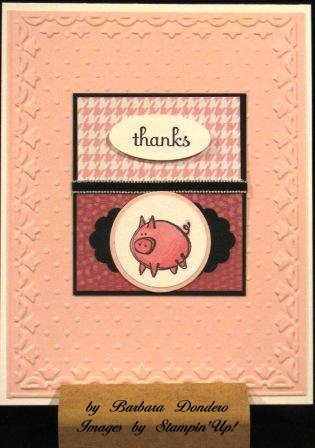
I have to confess that I didn't make this one for the challenge, but it is something I made not too long ago. I made a gift pack of these up for a wonderful friend who loves piggies. Do you recognize that cute little piglet? It's from a SAB set from a few years ago....sorry, it's no longer available. Neither is the background paper, it is from last year's Sweet Pea Paper Pack, but if you are like me, you still have tons left, right?!!

So, this card fits our embossing challenge this week. The background was double embossed with folders....first with the Perfect Polka Dots Embossing Folder and then with the wonderful Framed Tulips EF. By passing the cardstock through the Big Shot a second time, the dots flatten a bit, but it's still a lovely effect, don't you think? (This idea is from the talented and creative, Robin Merriman...she's just so clever!....and the layout was inspired by Tara Bazata's last GoDiva Swap. These ladies always have the BEST ideas!!)

The little pig was colored in using my non-SU Copic Sketch Markers...but almost everything else is from SU, even if a few things have retired. Fun card, isn't it? Joanne, the friend who received a gift set of these, loved them!
Stamps: Very Punny* (2007 SAB set), Fabulous Phrases
Inks: Pitch Black Alcohol Ink (non-SU)
CS: Piourette Pink, Basic Black, Whisper White
Misc: Sweet Pea DSP*, Scallop Oval Punch, Large Oval Punch, Dimensional, 1/8" Basic Black Taffeta Ribbon, Perfect Polka Dots EF, Framed Tulips EF, Big Shot
*Retired

Thanks so much for stopping by today. Be sure to check out what the others have been up to...see below.

Posted by Picasa


Saturday, February 5, 2011

Blogger's Challenge AND Techno Lunchtime Challenge

Whew! I'm here....very under the weather, but I'm here! So sorry I've been missing....I would rather have been here than in bed...which is basically where I've been since a week ago Friday. YUK! That awful winter cold that's been floating around here got me....thanks to my daughter. (We do teach them to share, right?!!) And I also have a sinus infection. OMG....never had one of those before and really, really hope I never get one again. (My face feels like it wants to fall off.) Anyway, that's where I've been....I'm now on antibiotics, so hopefully, I'm on the mend. I do feel ever so slightly better.....I hope you'll forgive me for not posting. (I did get a few things done....like laundry and dinner and food shopping.....but, I'd get something done and crawl right back into bed.) The really good news is that I have lost all those Christmas pounds!!

So...you are here for a card. I created this today, but honestly, it took me ALL day to come up with this! I was following MaryJo's sketch from last Monday and realized that it also fits the Bloggers' Challenge from Friday, which was a color challenge: Red, White & Black. Two birds with one stone! HA! My card here was inspired by this card. Julie's was a much more simple version, but I just loved it. Everything used on my sample is SU (almost), however, there are a couple of items that have retired, like the DSP is from a retired Hostess Paper Pack; and the felt flower is non-SU from my stash.

About the card....can you tell that the bird cage was cut out and raised? It's on a Dimensional. And there's a tiny little rhinestone at the very top. "True Friend" is part of one of the images from the Sale-a-Bration set, Punch Pals.....it was punched out using the now-retired 1/2" Round Punch.

Stamps: Aviary, Teeny Tiny Wishes, Punch Bunch
Inks: Basic Black, Real Red
CS: Basic Black, Whisper White, Real Red
Misc: 1/2" Round Punch*, Scallop Border Punch, Basic Rhinestone, Dimensional, DSP/Hostess Paper Pack*, Felt Flower (non-SU), Perfect Polka Dots EF, Big Shot, Mini Glue Dots
*Retired
Thanks so much for hanging in there with me...and thanks for stopping by today. See you again soon! Oh, and don't forget to check out the others who participated in either of these Challenges....in fact, if you'd like to play along, please feel free. Just don't forget to link back to the Blogger's Challenge and MaryJo's Lunchtime Challenge.

Posted by Picasa


LinkWithin

Blog Widget by LinkWithin