Check out all my photos here in one place!
Showing posts with label Bloggers Challenge. Show all posts

Thursday, August 4, 2011

Bloggers' Challenge -- Embossing

Sorry this is so late!!  Things were crazy last week at work....and now I'm "playing" in Myrtle Beach, SC!  Tried to get this posted before I left, but just plain ole' ran out of time.  Happily, I have internet service (which was a big surprise...didn't think I'd have it at my sister's condo), so, here I am.  Hopefully, you'll think this card sample is "better late than never!" 

Embossing is what got me hooked on stamping.....you see, I was at a craft convention...it seems like a thousand years ago....and saw a woman emboss a cute little teddy bear in gold....ohhhh! It was like magic.....I sooooo wanted to learn to do that!

Thinking back, gold teddies are not what I'm into any more, but I still really love embossed cards....we've certainly come a very long way since those early days.....as you can see from my card this week, there are NO gold embossed teddy bears here! LOL Actually, this is another of my Convention swaps....and it fits perfectly with this week's Bloggers' theme.   Our list "Mom," Lisa, gave us the Challenge this week....to emboss.

The flowers were embossed and then colored in using a color wash that I learned from Gretchen Barron's tutorial on her blog.....she is amazing.  Be sure to check out her blog.  After the flowers dried overnight, I cut each one out and added them to the card.
Hint:  I usually emboss Basic Black Craft Ink with Clear Embossing Powder...keeps those stray dots away!

And, speaking of embossing....today dry embossing SOOOO popular! Check out the So Saffron layer....YUP!...dry embossed with my Vintage Wallpaper EF. So, this card covers 2 different types of embossing. A dozen years or so ago, I would have been happy learning how to re-create that gold teddy bear....never in my wildest dreams did I think we could go beyond that!

Stamps: Fabulous Florets, Word Play
Inks: Basic Black Craft, Chocolate Chip, Tangerine Tango, Daffodil Delight
CS:  Whisper White, Chocolate Chip, Tangerine Tango, So Saffron, Shimmery White
Big Shot:  Tasteful Trim, Vintage Wallpaper EF, Scallop Circle #2 Die (used the larger of the 2), Little Leaves Sizzlet
Misc:  Circle Scissor Plus, Basic Pearls, Aqua Brush, Clear EP 

Thanks so much for stopping by today!


Posted by Picasa

Thursday, July 21, 2011

Sunglasses Needed!

This one is B-R-I-G-H-T....but, I'm loving the way it turned out! This week's Blogger's Challenge theme (it's good to be back!) is SUMMERTIME! Much of the country is HOT and that means we're all trying to stay as cool as possible....so flip flops are everywhere. (Check this link here.....I decorated some the other day....did you see them?)

Right now, SU has an adorable summer set available in the Summer Mini catalog, Sunny Fun, with flip flops, ice cream, and swimmers....but I don't have that. What I do have is this cute little flip flop stamp (non-SU), which I picked up a few years back at a craft store. This is the first time I've used it....how cute, right?!!  Hmmm...wonder what I was waiting for!!

I've set aside and packed up for a cards class that will take place this evening and I really didn't want to dip into those supplies, so I felt a little limited working with whatever was left in my stamp studio. This card didn't come out quite the way I might have normally made it, but I've fallen in love with it. Maybe I should try packing up many of my supplies more often, huh?!!

The card size is unusual for me....used the Scallop Square die for the card base.  I've been dying (pun intended!) to try this for a long time and this was the perfect card to try it with.  Just fold the cardstock in half and lay it in the die so that the one side doesn't cut away. Then just the cardfront was placed in the Perfect Polka Dots EF....the perfect match to those cute little summer sandals! Speaking of the flip flops, check out the flower centers.....added the Flower Brads in the center in Daffodil Delight, which matches the card base and a Basic Rhinestone was added in the center of each....I believe I used the mid-size. The ribbon on the side is now retired, but still matches the polka dot theme going on here.....in Melon Mambo. A bit of Tempting Turquoise sets it all off.   So, now I'm dressed for the weather....just trying to stay cool.

Stamps: Flip Flops--non SU, Short & Sweet
Inks: Melon Mambo, Tempting Turquoise
CS: Daffodil Delight, Whisper White, Tempting Turquoise
Big Shot: Scallop Square Die, Perfect Polka Dots EF, Scallop Squares Duo
Misc: Flower Brads in Daffodil Delight, Basic Rhinestones, Melon Mambo Polka Dot Grosgrain Ribbon (retired), Word Window Punch, Dimensionals (under flip flops)

This post also fits the Challenge over on Hand Stamped Sentiments....haven't played along with them in a long time!  Be sure to hop on over and check out their blog, too!

Thanks so much for stopping by and visiting today!


Posted by Picasa

Friday, July 8, 2011

Bloggers' Challenge -- Floral Frenzy

It just so happens that I was about to post this card and realized that it also fit this week's Bloggers' Challenge theme. You see, this was my swap card in the GoDiva swap group last month featuring new catalog items. I've said it before, but I really need to say again that the ladies that are a part of that group are so very talented and truthfully, I'm beyond astonished to be a part of stamping royalty....because that's what those ladies are! Since all participants received their swap cards last week, it's time to let you all in on a bit of what I've been up to.

The flowers shown here are from the new Hostess set, Simply Soft....a true 2-step stamp set. The outline of this flower were stamped in Basic Black, the second stamp fills in the flowers and was stamped in Wisteria Wonder, one of the fabulous new In Colors now available, and there's a dab of Dazzling Diamonds in the center, or on the stamen of each flower to just set it all off. Oh!...and check out that background! Is it not luscious?!!....I'm in love! A brand new Letterpress Plate, called Fancy Fan created this.....I inked it up with White Craft ink and sent it through my Big Shot.

Another new item used is the scallop circle....a new Bigz Die called Perfect Pennants. This new die has a couple cool medallion-type and 2 different sizes of pennants that can be rolled out. For this card, the medallion is the perfect backdrop of the punched circle.

Hope you'll join me in checking out the blogs of all those that join in our Challenge this week.  You won't be sorry.....also a talented group! 

Stamps: Simply Soft
Inks: White Craft, Basic Black, Wisteria Wonder
CS: Whisper White, Elegant Eggplant, Pear Pizzazz
Big Shot: Fancy Fan Letterpress Plate, Perfect Pennants Bigz Die
Misc: 2 1/2" Circle Punch, Dotted Ribbon Scallop Border Punch, Pear Pizzazz Marker, Whisper White Taffeta, 2-Way Glue Pen, Dazzling Diamonds Glitter

Thanks so much for stopping by today!


Posted by Picasa

Tuesday, May 3, 2011

Color This! (Rose-Blue-Green)

This one gave me a LOT of trouble!! The Challenge this past Friday was to use Rose, Green, and Blue. Well, I'm really not a pink & blue gal....it reminds me of baby cards.....and, while I like baby cards, I'm not very good at using those colors for other occasions.

This is the sample I came up with.....not entirely sure how I feel about it. The Rose is at the bottom of the card (impressed with the Vintage Wallpaper EF) and also used for coloring in the darker parts of the flowers. The Green was used for the leaves and stems. The Blue....well, that's where the trouble began! I decided to downplay it and used it only for the cute little butterfly and for the crystal brad in the center of the bow. I think this works.....I'd love it if you let me know what YOU think!

Stamps: Elements of Style
Inks: Basic Black
CS: Pirouette Pink (card base), Whisper White, Regal Rose
Markers: Regal Rose, Pink Pirouette, Certainly Celery, Pear Pizzazz
Misc: Pretty in Pink Satin Ribbon, Blue Crystal Brad, Beautiful Wings Embosslit, Vintage Wallpaper Embossing Folder, Big Shot, Basic Pearls, Mini Glue Dots

I'm sorry this is so late.....but I want to
thank you so much for stopping by today!


Posted by Picasa

Monday, April 25, 2011

Bloggers' Challenge -- Ribbon or Lace

It was a busy, busy week....and with a holiday in there, it was just way too hectic to get this to you on time....and I am so sorry about that! Hope fully, you celebrated with family and friends this past weekend. The weather was lovely here, hopefully where you were, too!

So, here is my sample for last Friday's Challenge....a lot late!  It gives you a peak at a cute little single stamp available in the Summer Mini Catalog, Hello Blossom. Cute, isn't it? (The mini goes live this Sunday!) The stamp actually has a letter in the center of each blossom spelling out "HELLO." As you can see, I've covered the letters up by using punched out circles, which are adhered using Mini Glue Dots and then covered over with Crystal Effects.

This card was fun to make and for my ribbon, I used the gathered ribbon. Like me, you've probably seen this technique in many places, but I have to admit it just isn't quite as easy as it appears to be! My gathering needs a bit more work since it really isn't even, so I definitely need some more practice!  But it doesn't look too bad, does it?

Stamps: Hello Blossom, Bold Blossom
Inks: Soft Suede
CS: Soft Suede, Pink Pirouette, Pear Pizzazz
Misc: Pear Pizzazz & Regal Rose Markers, Pretty in Pink Satin Ribbon, Lots of Tags Sizzlet, Big Shot, Square Green Ice Brad, Non-SU Border Punch, 1/4" Round Punch (retired), Round Punch from Itty Bitty Punch Pack, Mini Glue Dots, Crystal Effects

Thanks so much for stopping by today!


Posted by Picasa

Friday, April 15, 2011

Bloggers' Challenge -- April Sketch

Truthfully, I had this one done before last night, but ran out of time to post this on time....I just started a new job recently and I'm having a bit of a tough time juggling my time and various activities. I bought this set a short time ago and it's been sitting neglected on my desk top, so I really wanted to incorporate Have a Seat into this week's Challenge. This week, Lisa gave us a great sketch.....I stayed very close to the original....didn't even turn it around!

The vintage look isn't something that comes easily for me, but I wanted to give it a whirl this time around......I'm pleased with the way it came out, although it isn't a style that will come naturally to me, I'm afraid!

As you can see, the bench-style seat stamp was used in the center of a piece of Very Vanilla and over stamped with the Sanded background stamp. The edges of this piece were sponged in Crumb Cake and distressed before being added to the Riding Hood Red and Basic Black Layers. This was then placed onto Dimensionals. The background of the card was texturized with a Texturz plate (Kit #4)....I haven't used them in such a loooong time! The background paper shown here is again from Love Letter...this package of paper just lends itself to so many looks! Not to mention that it is gorgeous!!

The ribbon is retired and no longer available, but when it was out I was so in love with it and afraid I'd never be able to get any more so I bought 2 rolls.....naturally, I still have some sitting around!...It's in Riding Hood Red and Very Vanilla. But, this time, the ribbon was cut in half length-wise and unraveled just a bit. The button shown is also retired from last year, but is in Riding Hood Red to match.

Stamps: Have a Seat, Sanded, Congrats (retired)
Inks: Basic Black, Crumb Cake
CS: Very Vanilla, Riding Hood Red, Basic Black
Misc: Texturz Plate (Kit #4), Big Shot, Button Bouquet (Retired), Linen Thread, Cutter Kit (for distressing), Linen Thread, Modern Label Punch, Love Letters DSP, Dimensionals, 1 1/4" Striped Grosgrain Ribbon in Riding Hood Red (retired) 

Thanks so much for stopping by today....hope you enjoyed your stay here!
Posted by Picasa

Friday, April 8, 2011

Inspiration Bloggers' Challenge

This photo on the left was our inspiration for this week's Challenge....don't you love it?  The black and white framed photos against the light blue wall is just so crisp, simple in its design, but softened by the blue wall....IMHO.  So, that's what I went for when designing my Challenge card this week...simple and uncluttered design, crisp colors with Basic Black, Whisper White, and Baja Breeze.  I'm thrilled with the way this came out....so thrilled that this just may be my Convention swap this July.  Of course, I need to wait to see if everything on this card will be in the new catalog, but it's certainly a contender!

And guess what?!!  I didn't use the Big Shot for this card.  I KNOW.....you must be as shocked as I am!!  Truthfully, I did consider re-doing this and using the BS, but I decided to go with the "less is more" rule. 

This features a brand-new stamp set that will definitely be in our new catalog, Four Frames....and you can purchase this set right now!  It's available for a limited time, and you can be among the first to own this fun set before the official release!  For complete details this fabulous new set, click here....and then, of course, let me know you wish to purchase this set.

Not sure how this card looks on your screen, but the Baja Blue ink on the center greeting, the ribbon, and the cardstock background really DO match in real life.  On my screen, they don't, but I promise that they really, do match!!
  
To create this, the Whisper White cardstock was adhered to the Baja Blue background, using some Dotto (temporary adhesive).  Stamp in each corner; then remove the white cardstock which is then added to the black cardstock and then adhered permanently to the blue base.  It's a cool technique that has been around for a long time has a lot of impact....and is as easy as just described.  The Baja Breeze Seam Binding was wrapped around the black and white panel, the tag center was added, and those pretty little Basic Pearls added as the final touch. 

Stamps:  Elements of Style, Four Frames, Thank You Kindly
Inks:  Basic Black, Baja Breeze
CS:  Whisper White, Basic Black, Baja Breeze
Misc:  Baja Breeze Seam Binding, Designer Label Punch, Basic Pearls, Stamp-a-ma-jig*, Dotto
*You didn't think I was able to get mirror images on my own, did you?!!

Thanks so much for stopping by today!


Saturday, April 2, 2011

Let the Birds Sing!

Well, I know that I used this little stamp just last week for the Bloggers' Challenge, but it's just so dang cute...and I had not yet put it away. So, I figured I could use it again for this week's Challenge, which is BIRDS. SU has a ton of birds to choose from in their line...and I do have another to share in a day or so, but for the Challenge, this is it!

This layout was definitely inspired by the amazing Diana Gibbs,  (sorry....can't find a link to her original idea) but she made a square card...and although I like square cards, I simply do not make them....or send them!  So, I turned her idea into a regular size card. There are definitely some differences, a few less layers, different DSP, and then, of course, the bottom of the card......I had stamped in a greeting, which came out crooked and smudged, so I needed to cover it up and the scallop bottom idea was born!

This sample is totally current SU....I had considered using it for a stamp class I held last night, but decided about half way through that it might be too time consuming for my ladies. Since it's totally SU, the image was colored in using SU markers.  In my last post, I used Copics, and although I love using my Copics (my collection is quite small!), you can see that our markers work really well. I found a trick...color in using the lightest shade, highlight with a darker shade and then color over one more time with the lightest shade (see the tulips). By going over the area colored one last time with the lightest marker, it kind of smoothed out the rough edges and blended, or softened the colors. I believe the trick is to do each step, one right after another....in other words, don't let your project sit before continuing onto the next step. I guess the marker was maybe still a bit wet, or at least not totally cured.

So, what do you think? The tulips in the basket are more prominent that cute little blue bird.....does this qualify for our Challenge?

Stamps: A Flower for All Seasons, Tiny Tags
Inks: Jet Black StazOn, Pink Pirouette
CS: Whisper White, Pink Pirouette
Markers: Pink Pirouette, Pretty in Pink, Bashful Blue, Wild Wasabi, So Saffron, More Mustard Misc: Paper Piercer & Template, White Gel Pen, Pretty in Pink Grosgrain Ribbon, 2 3/8" Scallop Punch, 2 1/2" Circle Punch, Tasteful Trim Die, Lattice Die, Big Shot, Dimensionals , Designer Series Paper Pack-In Color

Thanks so much for stopping by and visiting today!

Friday, March 25, 2011

Bloggers' Challenge -- It's a Sketch

This week's Challenge was an easy one....a fairly simple layout, or sketch. The only thing that gave me trouble is that there are a lot of layers (see center of the card) and the section above and below the center for brads, buttons, bows, or whatever else we could think of. I almost left them off and then decided on the largest of the Basic Pearls. For a simple layout, I kinda felt there was a lot going on, but by going with softer colors, and keeping everything relatively simple, it worked for me.....hope you'll agree!

Last Friday, the weather was almost Summer-like...it was a beautiful day and the temperature hit the low 70s. Well, fast forward to this week, and we've had snow 3 times!! I'm so ready for Spring (I think I've said that before, haven't I?!!)....so this sweet little image with the bird and basket of tulips just cried Spring to me. Maybe this will help a bit!!

Everything on this card is from SU, except for the coloring part....I used my Copics. After coloring in this image, I then decided on the background colors. The pink background is Pink Pirouette....which really softened the overall look....I'm loving it paired with Certainly Celery.

To create the central circles and scallops I used.....
1 3/4" Round Punch and layered that onto a circle from the Circles Die. This is all layered onto 2 of the 2 3/8" Scallop punched layers. Then it's all popped up on Dimensionals.

So, there you have it....simple, right?!! Thanks for stopping by today.

Stamps: A Flower For All Seasons
Inks: Jet Black StazOn
CS: Whisper White, Pink Pirouette, Certainly Celery
Misc: 1 3/4" Round Punch, 2 3/8" Scallop Punch, Circles Die, Perfect Polka Dots EF, Finial Press EF, Big Shot, Certainly Celery Twill (retired), Basic Pearls, Copics

Just a little FYI....
If you are a Copic fan...and I know many are!...you'll be happy to know (according to my "local" stamp/scrapbook store...which is an hour away!!) that "everyone who works for the company is safe and the offices and production facilities survived the earthquake and aftershocks with minimal to no damage."  You see, the company that makes Copics is located just outside of Tokyo. It's nice to hear some good news coming out of Japan for a change!


Posted by Picasa

Sunday, March 20, 2011

Spring has Sprung!

......well, almost! Today was a cold one, but there are definitely signs that Spring is trying to push its way in......the trees have buds, the crocuses have popped, the days are definitely getting warmer (even if they begin cold)! Spring time officially arrived this weekend...at least on the calendar. So, last week's theme for our Challenge was very appropriately Spring Flowers!

My card for this Challenge is really not my original idea, but really a compilation of ideas that I've seen out there in cyberspace. This cute little Sale a Bration set, Sweet Summer, just arrived on my doorstep a few days ago.....I just couldn't resist it any longer!.....and I so wanted to use it while it is still current. And if you've been visiting my blog for any length of time, you'll know that one of my favorite color combinations is Crumb Cake and Baja Breeze. Although this is not bright like Spring cards can be, I hope it still qualifies....what do you think of this sample?

As you can see, I used Crumb Cake as my card base and impressed it with the Terrific Tulips Embossing Folder. That sweet little image was simply stamped on Whisper White CS in Basic Black ink and colored with markers. To dress it up a bit, the flowers were cut and popped up on Dimensionals....after being colored with a Blender Pen and a bit of ink off the lid; and some Basic Pearls (another of my favorite things!) were added in. Isn't this just so sweet?!!

Stamps: Sweet Summer, Tiny Tags
Inks: Basic Black, Baja Breeze
CS: Crumb Cake, Whisper White, Baja Breeze
Misc: DS Paper Pack (retired) in Kraft, Baja Breeze Seam Binding, Linen Thread, Baja Breeze Button (retired), Linen Thread, Basic Pearls, Blender Pen, Certainly Celery Marker, Baja Breeze Marker

Thanks so much for stopping by today and spending a little time here! And if you are loving this fun little stamp set, don't wait to long....it's such a versatile set and there's not much more time left to Sale a Brate and earn you own!! Be sure to contact me today to find out how you can earn it!

Posted by Picasa

Friday, March 11, 2011

Bloggers' Challenge -- Happy Birthday!

This week's theme, as you may have already guessed, is a birthday theme. Lisa is our list mom (she puts out the Challenges to us) has a birthday coming up....so, this is kind of like a mini birthday party for her! Happy Birthday, Lisa!! (Hope it's a great one!)

This card was a fun one to make...one I made about a month ago for the birthday of a very good friend.  I took my colors for the card from this DSP, Sweet & Sour Specialty paper.  The DSP was layered onto a base of Rose Red CS.  Then there's that scallop square created by the Scallop Square Duo Die and my Big Shot, topped with a couple of layers of CS...can you see them?  A bit of Pink Pirouette shows through under the Whisper White layer, but on top of the Pumpkin Pie. 

And how cute is that cupcake?  It's from the fun little set in the Occasions Mini, Create a Cupcake and the matching punch.  I was so happy with the way this card came out...but, it definitely was inspired by this one here.  Now, if you've clicked on that link and you are a SU Demonstrator, you should be able to click right over, but, if you are not, you cannot view the inspiration sample (so sorry!), as it is located on a demo-only site.  (Another reason you NEED to become a SU demo!!)

Oh, and that bow...made with the luscious Whisper White Satin ribbon....was created with the Bow Easy (a non-SU item)....something I received as a gift and makes the best, most perfect bows!  Well, that's it for today.  Thank you so much for stopping by today...hope you enjoyed today's share.

Stamps:  Create a Cupcake
Inks:  Rose Red, Pumpkin Pie, Pink Pirouette
CS:  Whisper White, Rose Red, Pumpkin Pie, Pink Pirouette
Misc:  Build a Cupcake Punch, Word Window Punch, Big Shot, Scallop Square Duo Die, Perfect Polka Dots Embossing Folder, Sweet & Sour Specialty DSP, Whisper White Satin Ribbon, Mini Glue Dots (for holding the bow on), 2-Way Glue Pen, Dazzling Diamonds (on the frosting)


Posted by Picasa

Friday, March 4, 2011

Bloggers' Challenge -- Peach/Green/White

OK...your screen is NOT off....your eyes are NOT deceiving you!  I goofed....so, just imagine that the So Saffron color is Peach Parfait instead.  (I don't know where my head is at these days!!)   I was thinking peach when I created this card this morning, but I reached for So Saffron instead. I'm really having a "dumb blonde day" today.....hope the other Bloggers' don't mind my mistake!!

Anyway, I'm in love with Wild Wasabi these days (did you notice?!!...I've used it in a few recent postings), so this is presently my "go to" green color.  IMHO, it's just such a lovely, Spring-like green.  And to think I wasn't very impressed a couple of years ago when this was an In-Color!  Hmm....guess we all evolve with time, right?!!

Anyway, I wanted to keep this card kind of simple...it began with an entirely different layout in mind!  (That process of evolving!)  There's actually quite a bit going on here, but since the backgrounds are color-on-color, it doesn't really look too busy. 

Can you see the die cut Lattice background?  Well, originally, I thought that it would be perfect for the Inlaid Embossing technique.  And quite possibly, it would be....IF it wasn't the same color as the background.  Since the die cut piece is the same color as the card background, it simply disappeared!  Even in real life, I could barely see it....and that simply will not do!!  You see, with all those tiny sections, adhering the cut piece to the embossed background is a bit tricky, so I figured the inlaid process would take care of that....but, NOPE, that didn't work at all!  Guess, it needed to be a contrasting color. 

So, once the background was fixed, a circle was die cut from the Circles #2 die (it's the 3rd largest size)...but, if you are lucky enough to own the new 2 1/2" Circle Punch, that would work as well.  (Mine has been on backorder!)  Then the circle was simply stamped in Wild Wasabi and the flowers were added in.  Aren't those dimensional flowers....created with the Flower Fusion Sizzlet...just adorable?!!  The centers are  Bitty Buttons tied with a bit of Linen Thread. 

All in all, when I worked out the kinks, it was a very fun card to create....and even if I used the wrong color scheme, I love the fresh, Spring-like look!!  (Oh!  I hope Spring comes soon...don't you?)

Stamps:  For All You Do, Because I Care (greeting)
Inks:  Wild Wasabi, So Saffron, Basic Gray
CS:  Whisper White, Wild Wasabi, So Saffron
Misc:  Big Shot, Lattice Die, Square Lattice EF, Circle #2 Die, Flower Fusion Sizzlet, Bitty Buttons, Linen Thread, Mini Glue Dots, Modern Label Punch, Large Oval Punch, 1 1/4" Round Punch, 1/8" Taffeta Ribbon in Daffodil Delight

Thanks so much for stopping by today! 

Saturday, February 19, 2011

Bloggers' Challenge -- Embossing

That cold I managed to get, paired with a sinus infection had me down and out....if you have been "lucky" enough to have had that cold yourself, you know just how awful it can be! I'm sorry I've been away for awhile, but I just didn't have the energy to come up with a creative idea...or get to my stamp studio...or even post anything! Fortunately, I'm feeling soooo much better....but it took 3 weeks! So, I'm a bit behind......YIKES!

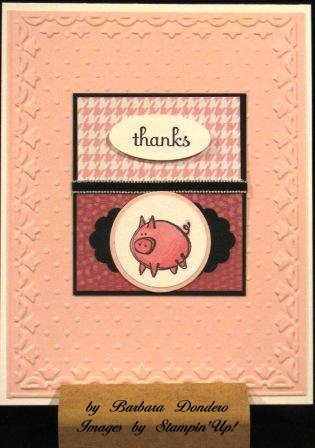
I have to confess that I didn't make this one for the challenge, but it is something I made not too long ago. I made a gift pack of these up for a wonderful friend who loves piggies. Do you recognize that cute little piglet? It's from a SAB set from a few years ago....sorry, it's no longer available. Neither is the background paper, it is from last year's Sweet Pea Paper Pack, but if you are like me, you still have tons left, right?!!

So, this card fits our embossing challenge this week. The background was double embossed with folders....first with the Perfect Polka Dots Embossing Folder and then with the wonderful Framed Tulips EF. By passing the cardstock through the Big Shot a second time, the dots flatten a bit, but it's still a lovely effect, don't you think? (This idea is from the talented and creative, Robin Merriman...she's just so clever!....and the layout was inspired by Tara Bazata's last GoDiva Swap. These ladies always have the BEST ideas!!)

The little pig was colored in using my non-SU Copic Sketch Markers...but almost everything else is from SU, even if a few things have retired. Fun card, isn't it? Joanne, the friend who received a gift set of these, loved them!
Stamps: Very Punny* (2007 SAB set), Fabulous Phrases
Inks: Pitch Black Alcohol Ink (non-SU)
CS: Piourette Pink, Basic Black, Whisper White
Misc: Sweet Pea DSP*, Scallop Oval Punch, Large Oval Punch, Dimensional, 1/8" Basic Black Taffeta Ribbon, Perfect Polka Dots EF, Framed Tulips EF, Big Shot
*Retired

Thanks so much for stopping by today. Be sure to check out what the others have been up to...see below.

Posted by Picasa


Saturday, February 5, 2011

Blogger's Challenge AND Techno Lunchtime Challenge

Whew! I'm here....very under the weather, but I'm here! So sorry I've been missing....I would rather have been here than in bed...which is basically where I've been since a week ago Friday. YUK! That awful winter cold that's been floating around here got me....thanks to my daughter. (We do teach them to share, right?!!) And I also have a sinus infection. OMG....never had one of those before and really, really hope I never get one again. (My face feels like it wants to fall off.) Anyway, that's where I've been....I'm now on antibiotics, so hopefully, I'm on the mend. I do feel ever so slightly better.....I hope you'll forgive me for not posting. (I did get a few things done....like laundry and dinner and food shopping.....but, I'd get something done and crawl right back into bed.) The really good news is that I have lost all those Christmas pounds!!

So...you are here for a card. I created this today, but honestly, it took me ALL day to come up with this! I was following MaryJo's sketch from last Monday and realized that it also fits the Bloggers' Challenge from Friday, which was a color challenge: Red, White & Black. Two birds with one stone! HA! My card here was inspired by this card. Julie's was a much more simple version, but I just loved it. Everything used on my sample is SU (almost), however, there are a couple of items that have retired, like the DSP is from a retired Hostess Paper Pack; and the felt flower is non-SU from my stash.

About the card....can you tell that the bird cage was cut out and raised? It's on a Dimensional. And there's a tiny little rhinestone at the very top. "True Friend" is part of one of the images from the Sale-a-Bration set, Punch Pals.....it was punched out using the now-retired 1/2" Round Punch.

Stamps: Aviary, Teeny Tiny Wishes, Punch Bunch
Inks: Basic Black, Real Red
CS: Basic Black, Whisper White, Real Red
Misc: 1/2" Round Punch*, Scallop Border Punch, Basic Rhinestone, Dimensional, DSP/Hostess Paper Pack*, Felt Flower (non-SU), Perfect Polka Dots EF, Big Shot, Mini Glue Dots
*Retired
Thanks so much for hanging in there with me...and thanks for stopping by today. See you again soon! Oh, and don't forget to check out the others who participated in either of these Challenges....in fact, if you'd like to play along, please feel free. Just don't forget to link back to the Blogger's Challenge and MaryJo's Lunchtime Challenge.

Posted by Picasa


Friday, January 21, 2011

Bloggers' Challenge -- Designer Series Paper

This week, Lisa challenged us to work with Designer Series Paper in a creative way....kind of like DSP with a twist! Well, it just so happens that I had not had a chance to share this with you before and it works perfectly for today's Challange!

Back in November, I needed a small gift package and this is what I came up with....it really was simple and quick to make! Can you tell what this was originally? It's a simple, every-day brown paper lunch bag....something most of us have around in our cabinets. For this package, I cut the bag down to 6" (keep it folded) and then added DSP to the front and back, covering completely. (The pleated sides are still exposed, but that's OK!) The stamped portion was created using just markers to get all the different colors for the flower (it's one stamp). However, the greeting was stamped in ink, using Fabulous Phrases....so the Stamp a ma jig was definitely in order so that the words lined up exactly. The word stamps in this set are all individual, giving you the versatility of making your own phrases and greetings.....definitely a great idea and bargain!

For the topper, I'm sorry, but I cannot remember the dimensions....but I can tell you that it's as wide as the bag. I believe there's about a 1" flap on the back of the bag, which was adhered really well using Sticky Strip. The fold over for the front was not a special measurement....it was just something that I thought was eye pleasing. Can you see the edge was punched with the Pinking Hearts Punch and then just a tiny little strip of Daffodil Delight CS was added over top. Oh, and the last thing was the Certainly Celery Wide Grosgrain added (which matches the Pear Pizzazz color of the DSP!) around the bottom of the stamped image and then for the handle. What a fun way to package up a gift!

Stamps: Friends Never Fade, Fabulous Phrases
Inks: Early Espresso
CS: Very Vanilla, Early Espresso, Daffodil Delight
Markers: Pear Pizzazz, Riding Hood Red, Early Espresso
Misc: Pinking Hearts Punch, Crop-a-dile (for handle), Sticky Strip, Certainly Celery Wide Grosgrain

Thanks so much for stopping by today!


Posted by Picasa

Friday, January 14, 2011

Bloggers' Challenge -- It's a Sketch!

It's been awhile since I've been able to join in the fun with the Bloggers' Challenges. This week, Lisa, our list Mom, gave us a sketch. I kept pretty true to the original sketch and this is what I came up with.....although I have to admit to beginning with a completely different idea! Somehow this cute little guy just kept calling me....he needed to be inked!

That sweet little lamb is from Pun Fun, a set I haven't used in some time....not sure why, 'cause I really do enjoy working with each of the images. The face and heart were water colored in using markers and a blender pen....used the "marker off the lid" technique, an old standby. The heart (not sure you can tell) was glittered, as were the hearts on the impressed squarish panel background.

Not quite sure yet, but this may be one of my Valentine's cards this year ...I'm really happy with the way this came out....kinda sweet, don't you think?

Stamps: Pun Fun, Fabulous Phrases, Create a Cupcake (heart)
Inks: Basic Black Craft, Real Red Classic
CS: Whisper White, Basic Gray, Real Red
Misc: 1 3/4" Circle Punch, 2 3/8" Scallop Circle Punch, Word Window Punch, Corner Rounder Punch, Pinking Hearts Border Punch, Big Shot, Heart EF (non-SU), Perfect Polka Dots EF, Circles #2 Die (for red circle layer), Scallop Duo Die (still available!), Clear Embossing Powder, Real Red Mini Brads, Paper Piercer & Template, 2-Way Glue Pen, Dazzling Diamonds Glitter, Dimensionals (under scallop circle), Real Red Satin Ribbon, Stamp-a-ma-jig (couldn't live without it!!) , Blender Pen

Thanks so much for stopping by and visiting! Can't wait to see what the others have been up to....won't you join me? (See thumbnails below.)

Posted by Picasa


Sunday, December 5, 2010

Bloggers' Challenge -- Create a Christmas Ornament

I was cruising the web recently, and found a blog that had beautiful ornaments. I finally gathered up all the needed supplies and then, wouldn't you know it...I couldn't find the blog! So, I think I sort of duplicated hers, but maybe not....I certainly tried. If you happen to have seen, or know of a blog where the owner created the look of old-fashioned mercury ornaments, please let me know! (I'd love to go back and visit....and, of course, give her credit!!)

It was easy to create this...I used a plain, glass ball from a craft store.
-First, rub it down with rubbing alcohol to be sure it's good and clean.
-Remove the cap.
-Then using a piece of felt, I wiped alcohol ink over the entire ball. I used Adirondak Carmel ink. (Set aside to dry for a bit....I was impatient, so I only waited about 10-15 minutes.
-Drop dots of ink onto the felt piece once again, and dab over the entire ball. The ink spreads and gives it a really pretty mottled look.
-Set aside to dry overnight.
(NOTE: I added in dabs of Silver Encore ink.....do NOT do this! Although it gives the ornament a wonderful glow, it simply does not dry. I knew this and thought it might work anyway on the glass....NOPE! It doesn't!! I had to spray it so it wouldn't be tacky.....and then it lost some luster.)

To decorate the top, I added a piece of SU retired silver cord (I sure hope they bring that back one day...my supply is running low!!). The bow is made with the fabulous Cherry Cobbler Seam Binding and Chantilly Lace. Top the bow with a Designer Button from the Holiday Mini in Cherry Cobbler, into which an Antique Brad was inserted. This was added to the bow with a Pop Up Glue Dot (now retired) and then I added in some leaves created with a now-retired Martha Stewart punch in Always Artichoke.

So, there it is....I'm loving the finished product and can't wait to see how it looks on my tree....which we are putting up today! Thanks so much for stopping by and please take some time to visit the other bloggers who participate in our Challenges. I can't wait to see what they have all come up with....see you there!

Posted by Picasa

Saturday, November 27, 2010

Double Duty Challenge

Here I am....finally! How was your Thanksgiving? Mine was busy and hectic....I hosted dinner for 20. I just love having my family around....my son and his new bride traveled up from Virginia; my one daughter was home from college; and 3 of my siblings came for the day along with their spouses and children and 1 grandchild (not mine)...oh, and my Mom, of course! It was mass confusion.....very noisy......but oh, so fun! BUT, along with that came lots of preparation....took me all week to clean the house, shop and prepare. Although, I really have to admit that I did no cooking the day of.....everyone brought something along and my son and new daughter in law cooked whatever needed to be prepared on Thursday and my daughters set up everything. I'm feeling so much better (finally....YAY!), but my stamina isn't back yet, which is kind of frustrating, because the mind is going at full speed, but the body just isn't.....yet!

So, with everything going on this past week, I just wasn't able to get into my stamp room, much less stamp! But, I actually caught a little quiet time earlier this evening and was able to sneak away and make a few cards....it felt so good to touch rubber again!

Without even realizing it, I accidentally combined two Challenges....which, yes, are both late! MaryJo's Sketch Challenge from last Monday has been rolling around in this old brain of mine and I finally decided to use buttons down the side. When I was deciding on colors, I wasn't thinking and just went with those from this past Friday's Bloggers' Challenge. So....we have two in one.....and I really wanted to make a card for each! Oh, well....whatever works, right?!!

You can see MaryJo's sketch here. And the challenge this week to the Bloggers' group was a color challenge: Rust, Blue, Mustard.....I used Not Quite Navy, Baja Breeze, Cajun Craze, More Mustard. These colors are really lovely together! For this card, I stamped the image a few times onto Whisper White in Versamark and embossed with Clear EP and sponged over top to get the colors I wanted/needed......not altogher happy with my sponging....something seems to be a off. But, still, it's OK, and to be honest, I didn't want to start all over again.....so, please be kind!

So, I hope you enjoyed your visit to my little blog today....thanks so much for stopping by. Please take a few minutes to stop by MaryJo's place to see who participated and what wonderful creations were contributed.....AND, of course, you can't miss the Bloggers'.....they are always so creative!

Stamps: Just Believe, Day of Gratitude
Inks: Versamark, Not Quite of Navy, More Mustard, Baja Breeze
CS: Not Quite Navy, Cajun Craze, Baja Breeze, Whisper White
Misc: Sponges, Clear EP, Small & Large Oval Punches, Dotted Scallop Border Punch, Linen Thread, Dimensionals, Not Quite Navy Buttons(retired), Mini Glue Dots

Posted by Picasa

LinkWithin

Blog Widget by LinkWithin