Check out all my photos here in one place!

Wednesday, April 27, 2011

Let's Go Shopping!

Is this a fun card or what?!! So many of us love to go shopping...shopping for that bargain is part of the hunt...and often makes the trip so worth it. What is more perfect than a trio of purses? Do you recognize the elements of each purse? Can you see how they were made?

Well, they were made with the Create a Cupcake stamp set and the Build a Cupcake punch...both are in the current mini (Occasions Mini), which is about to expire on April 30, 2011!!....only a few days left to get these great items!!  The body of each purse was created by stamping the base of the cupcake and punching it out....except for the center purse, which was simply punched from DSP. The fashioned by first punching the Small Oval Punch and then following up with the Large Oval Punch, cut each created oval in half and there you go!! (For reference, check out this post from long ago, just scroll down past the card....same principal applies.) The flap is simply a 3/4" circle punch, folded over top of the inverted cupcake bottom and the finishing touch is one of the Basic Rhinestones.

This is the card I used for my shoe box swap submission that I attended about 2 months ago. But, as you can see at the bottom of the photo, this idea was inspired by the uber-talented Carrie Gaskin, another of my stamping idols.

Stamps: Great Friend, Create a Cupcake
Inks: Early Espresso
CS: Pink Pirouette, Very Vanilla, Early Espresso
Misc: Build a Cupcake Punch, Small Oval Punch, Large Oval Punch, Very Vanilla Taffeta Ribbon, Dimensionals (under each "purse"), Basic Rhinestones, 3/4" Circle Punch, Framed Tulips EF, Big Shot, Designer Series Pack--In Colors/Hostess Level 1 

Thanks so much for stopping by and spending a bit of time with me today!!

Posted by Picasa

Tuesday, April 26, 2011

MaryJo's Sketch #171

Another sneak peak! This card, which follows MaryJo's sketch #171, uses a brand-new, about-to-be-released set called The Open Sea.....perfect for all those manly cards we need to make! I haven't purchased a set that is a good masculine set in a very long time and when I saw this, I knew it was a must have....AND you can purchase it from the new Summer Mini, which goes live this Sunday, May 1.

This week, I turned the sketch on its side. You can see the original sketch when you click on MaryJo's sample below in the Blog Hop thumbnails. The ship was simply stamped in Night of Navy and then I used my blender pen to bring the blue into the sails....it's a technique I've loved for years and is just so easy to do! As you can see the base of the card was dry embossed with my favorite folder, the Square Lattice EF and the Big shot. There's also a bit more on this card that will soon be available....the Baker's Twine. It's actually available in solid white, Cherry Cobbler and White (which is shown here), and Early Espresso and White....and at only $2.95 for 25 yards, it's a real bargain!  Actually, the Cherry Cobbler blends well with the Riding Hood Red on this card. The button is now retired, but matches Riding Hood Red as well!

Stamps: The Open Sea
Inks: Night of Navy
CS: Whisper White, Night of Navy, Riding Hood Red
Misc: Button (retired), Cherry Cobbler Baker's Twine, Ticket Corner Punch, Silver Mini Brads, Paper Piercer & Template, Blender Pen, Crop-a-dile (See holes at top of card? They are for wrapping and threading the twine through!)

Thanks so much for stopping by and visiting today!


Posted by Picasa

Monday, April 25, 2011

Bloggers' Challenge -- Ribbon or Lace

It was a busy, busy week....and with a holiday in there, it was just way too hectic to get this to you on time....and I am so sorry about that! Hope fully, you celebrated with family and friends this past weekend. The weather was lovely here, hopefully where you were, too!

So, here is my sample for last Friday's Challenge....a lot late!  It gives you a peak at a cute little single stamp available in the Summer Mini Catalog, Hello Blossom. Cute, isn't it? (The mini goes live this Sunday!) The stamp actually has a letter in the center of each blossom spelling out "HELLO." As you can see, I've covered the letters up by using punched out circles, which are adhered using Mini Glue Dots and then covered over with Crystal Effects.

This card was fun to make and for my ribbon, I used the gathered ribbon. Like me, you've probably seen this technique in many places, but I have to admit it just isn't quite as easy as it appears to be! My gathering needs a bit more work since it really isn't even, so I definitely need some more practice!  But it doesn't look too bad, does it?

Stamps: Hello Blossom, Bold Blossom
Inks: Soft Suede
CS: Soft Suede, Pink Pirouette, Pear Pizzazz
Misc: Pear Pizzazz & Regal Rose Markers, Pretty in Pink Satin Ribbon, Lots of Tags Sizzlet, Big Shot, Square Green Ice Brad, Non-SU Border Punch, 1/4" Round Punch (retired), Round Punch from Itty Bitty Punch Pack, Mini Glue Dots, Crystal Effects

Thanks so much for stopping by today!


Posted by Picasa

Sunday, April 17, 2011

MaryJo's Lunchtime Sketch #170

After the tough time I had with last week's sketch, this one was a breeze....and fun!  I used this set for my last post; and although I'm typically fairly good about putting things away after I use them, this was still on my desk top.  (Don't be impressed...like most rubber stampers, my stamp studio is FAR from neat!....I tend to gather and add things into my small space by just dumping them in the closest semi-empty spot!)    

Obviously, this card has a completely different look from my last post.  Yes, the last post was a sketch challenge, as is this...both are very different, but so is the style.  This set, Have a Seat, is so cool!  I've had my eye on it since last summer when the catalog was released...now, I'm kind of sorry I waited so long to get it because I missed out on the fun of using it all that time!!

As you can see, the Marina Mist background was impressed by using the Square Lattice Embossing Folder in my Big Shot (what a shock....it's still my "go to" embossing folder!).  Then for the Whisper White panel...again, as you can see....I stamped the chairs all over, creating a background paper-type pattern.  The "banner" across the bottom is raised on Dimensionals.  Anyway, the card is kinda simple, but I am happy with it...guess, it's more "my" style than the last vintage one I tried!

Stamps:  Have a Seat, Curley Cute
Inks:  Crumb Cake, Not Quite Navy
CS:  Whisper White, Marina Mist, Crumb Cake, Not Quite Navy
Misc:  Square Punch*, Dimensionals, Paper Piercer & Template, Not Quite Navy Mini Brads (Retired), Square Lattice Embossing Folder, Big Shot, Dotted Scallop Ribbon Border Punch


Friday, April 15, 2011

Bloggers' Challenge -- April Sketch

Truthfully, I had this one done before last night, but ran out of time to post this on time....I just started a new job recently and I'm having a bit of a tough time juggling my time and various activities. I bought this set a short time ago and it's been sitting neglected on my desk top, so I really wanted to incorporate Have a Seat into this week's Challenge. This week, Lisa gave us a great sketch.....I stayed very close to the original....didn't even turn it around!

The vintage look isn't something that comes easily for me, but I wanted to give it a whirl this time around......I'm pleased with the way it came out, although it isn't a style that will come naturally to me, I'm afraid!

As you can see, the bench-style seat stamp was used in the center of a piece of Very Vanilla and over stamped with the Sanded background stamp. The edges of this piece were sponged in Crumb Cake and distressed before being added to the Riding Hood Red and Basic Black Layers. This was then placed onto Dimensionals. The background of the card was texturized with a Texturz plate (Kit #4)....I haven't used them in such a loooong time! The background paper shown here is again from Love Letter...this package of paper just lends itself to so many looks! Not to mention that it is gorgeous!!

The ribbon is retired and no longer available, but when it was out I was so in love with it and afraid I'd never be able to get any more so I bought 2 rolls.....naturally, I still have some sitting around!...It's in Riding Hood Red and Very Vanilla. But, this time, the ribbon was cut in half length-wise and unraveled just a bit. The button shown is also retired from last year, but is in Riding Hood Red to match.

Stamps: Have a Seat, Sanded, Congrats (retired)
Inks: Basic Black, Crumb Cake
CS: Very Vanilla, Riding Hood Red, Basic Black
Misc: Texturz Plate (Kit #4), Big Shot, Button Bouquet (Retired), Linen Thread, Cutter Kit (for distressing), Linen Thread, Modern Label Punch, Love Letters DSP, Dimensionals, 1 1/4" Striped Grosgrain Ribbon in Riding Hood Red (retired) 

Thanks so much for stopping by today....hope you enjoyed your stay here!
Posted by Picasa

Monday, April 11, 2011

MaryJo's Lunchtime Sketch

This week's Challenge sketch was a very tough one...at least for me.  This is what I came up with....not crazy about it, but then, to be honest, I'm not crazy about the sketch either.  (Sorry, MJ!)  But, after MANY trials and errors, I came up with something that is at least presentable!  As you can see, I used some punches, the Big Shot (of course!), Linen Thread, and DSP.  Those diagonal stripes across the card made it kind of busy, so too much DSP (which is how I began) was way too much!  So, the Pumpkin Pie layer was added...or replaced....instead.  Originally, I added little pennant flags "hanging" from the thread across...again, too much!  (And I thought it was an ingenious idea!)  Instead, I layered Very Vanilla Taffeta Ribbon over the Pumpkin Pie layer, topped with a zig-zag of Rose Red CS (created with my Big Shot and the Tasteful Trim Bigz Die) and tied over top with Linen Thread.  Whew!   At least now, each element can be seen and is not fighting for attention!  That cute little cupcake showcases the Create a Cupcake set from the Spring Mini and the Build a Cupcake Punch...also from the Mini.  These are placed upon a 2 1/2" Circle, a circle created from the Circles Die, and then "2 3/8" Scallop Punch. 

What do you think?  Is it too busy?  Did I rise to the occasion?  As I mentioned, I'm really not so sure about this one, so feedback would be great....I'd love to hear your comments!  See?...this just goes to show that even those of us who stamp frequently struggle, too! 

Stamps:  Create a Cupcake
Inks:  Pumpkin Pie, Rose Red, Pink Pirouette
CS:  Whisper White, Pumpkin Pie, Rose Red
Misc:  Tasteful Trim Bigz Die, Circles Die, Big Shot, Build a Cupcake Punch, 2 1/2" Round Punch, 2 3/8" Scallop Punch, Word Window Punch, Dimensionals, Linen Thread, Very Vanilla Taffeta Ribbon, Sweet & Sour Specialty Paper

Thanks so much for stopping by today!


Friday, April 8, 2011

Inspiration Bloggers' Challenge

This photo on the left was our inspiration for this week's Challenge....don't you love it?  The black and white framed photos against the light blue wall is just so crisp, simple in its design, but softened by the blue wall....IMHO.  So, that's what I went for when designing my Challenge card this week...simple and uncluttered design, crisp colors with Basic Black, Whisper White, and Baja Breeze.  I'm thrilled with the way this came out....so thrilled that this just may be my Convention swap this July.  Of course, I need to wait to see if everything on this card will be in the new catalog, but it's certainly a contender!

And guess what?!!  I didn't use the Big Shot for this card.  I KNOW.....you must be as shocked as I am!!  Truthfully, I did consider re-doing this and using the BS, but I decided to go with the "less is more" rule. 

This features a brand-new stamp set that will definitely be in our new catalog, Four Frames....and you can purchase this set right now!  It's available for a limited time, and you can be among the first to own this fun set before the official release!  For complete details this fabulous new set, click here....and then, of course, let me know you wish to purchase this set.

Not sure how this card looks on your screen, but the Baja Blue ink on the center greeting, the ribbon, and the cardstock background really DO match in real life.  On my screen, they don't, but I promise that they really, do match!!
  
To create this, the Whisper White cardstock was adhered to the Baja Blue background, using some Dotto (temporary adhesive).  Stamp in each corner; then remove the white cardstock which is then added to the black cardstock and then adhered permanently to the blue base.  It's a cool technique that has been around for a long time has a lot of impact....and is as easy as just described.  The Baja Breeze Seam Binding was wrapped around the black and white panel, the tag center was added, and those pretty little Basic Pearls added as the final touch. 

Stamps:  Elements of Style, Four Frames, Thank You Kindly
Inks:  Basic Black, Baja Breeze
CS:  Whisper White, Basic Black, Baja Breeze
Misc:  Baja Breeze Seam Binding, Designer Label Punch, Basic Pearls, Stamp-a-ma-jig*, Dotto
*You didn't think I was able to get mirror images on my own, did you?!!

Thanks so much for stopping by today!


Thursday, April 7, 2011

Bird on a Branch

I know....I really need to get more creative with my post names!  But, as promised, here is my other bird card.  I made this about a month  ago for one of MaryJo's Challenges....but in the end, it didn't work for the Challenge.  Truthfully, I wasn't sure then and still don't know how I feel about this card.  What's your opinion...I'd really love to hear from you.

There is so little stamping on this card...it's almost embarrassing!  Easy, easy, easy!  The white 1/2 background piece was created in the Big Shot with the Top Note Die....it's slightly more than half of the shape.  It was layered on top with 2 pieces cut in Tempting Turquoise from the Lattice Die and added to the Top Note before cutting the Top Note shape. 

Then there's the bird...first stamped in Rich Razzelberry onto Rich Razzelberry cardstock with the Hostess Level 1 set, Punch Potpourri...do you own your set yet?  No?  It really is a must have...and each shape matches a punch in the SU collection!!  The bird in that set does not have a wing, but the 2-Step Bird Punch does.....can you see that it was sponged around the edges?  It really is such a small thing that adds so much...and is so quick and easy to do!  Of course, a little mini Basic Pearl was added for his eye. 

As you can see, he's sitting on a punched background.....the Designer Label Punch was stamped 3 times and added as if they are in graduated sizes.  If you'd like to learn how to do this (it's really easy!), please let me know....there are tutorials in many spots on the net, so you may have already seen the directions.  The final addition is a band and bow with White Taffeta Ribbon...still loving that stuff!

Anyway, this is what I was originally going to submit this past Friday/Weekend for the Bloggers' Bird Challenge....but, I liked this one so much better, even if the little bird is tiny!

Stamps:  Punch Potpourri-Hostess Level 1
Inks:  Rich Razzelberry
CS:  Whisper White, Old Olive, Tempting Turquoise, Rich Razzelberry
Big Shot:  Lattice Die, Top Note Die
Misc:  Designer Label Punch, 2-Step Bird Punch, White Taffeta Ribbon, Basic Pearl

Thanks so much for stopping by today!


Tuesday, April 5, 2011

Late Birthday Gift...Isn't it Fabulous?

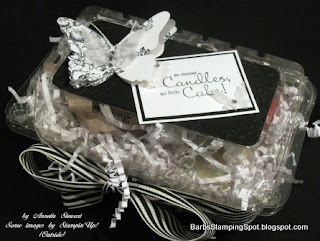
About 2 weeks ago, a few of my stamping friends and I got together for a shoebox swap.  We also celebrated a few birthdays that had recently passed....including mine!  Each gift was fun and they were given in grab bag fashion to those of us who recently celebrated....this one was what I received.  Check out the container...can you guess what it is?  This is just such a clever idea.  Give up?  It's a strawberry container.  I don't know about you, but I don't think I'll ever look at those containers the same way again!

As you can see, Annette , put some shredded paper inside, tied some of that wonderful black stripe grosgrain around the side and decorated the top with Basic Black cardstock, a greeting and some butterflies.  Isn't this fun?!!

And, now you want to know about the inside, don't you?!!  There's a small glass candle holder, decorated with some Crumb Cake Seam Binding and a ribbon rose.  Of course, there's a candle inside and 2 extra candles were included as well.  Not sure about you, but I thought this was a wonderfully, creative way to make a simple gift so much more special.  Thank you, Annette, for such a awesome gift!

Stamps:  Elements of Style, Non-SU greetings
Inks:  Basic Black
CS:  Whisper White, Basic Black, Vellum
Misc:   Beautiful Butterflies, Beautiful Wings Embosslit, Big Shot, Crumb Cake Seam Binding, Ribbon Rose, Basic Black 1 1/4" Grosgrain Ribbon 

Thanks so much for stopping by today!


Monday, April 4, 2011

MaryJo's Lunchtime Sketch Challenge

I'm in!! It was a busy stamping week last week, but I really wanted to participate....the sketch this week was actually one I was able to turn into a card! You see, I'm not always successful...sometimes the sizing is wrong, or I just can't come up with an idea for the sketch at all...or I run out of time. But this card is one I dreamed of last night....don't laugh! Haven't YOU dreamt of a stamping idea at some time?!!

This stamp and background paper combination has been combined in various ways for cards this past year and when I downloaded this week's sketch, I really wasn't sure what to do with it...that is until I went to bed last night! (It's OK...my hubby thinks I'm nuts, so you may think so, too!)

You know, this is the time of year when we begin anticipating the new catalog....and wonder which sets will retire. I am concerned about this set....maybe because I haven't seen a ton of ideas with it, but with the vintage look being so popular, I'm just not sure why! So, I thought I really need to use this set more. It's a great 2-stamp set, that's inexpensive and easy to use....it's just perfect with some DSP for a quick and easy card.

Back to my card........you can see MaryJo's original sketch here. Those little tabs in the bottom right corner gave me a bit of trouble, but other than than, it was a "piece of cake!" The Thank You stamp was double matted and then placed on Dimensionals. Oh, and I sponged a bit around the edges of the stamped cardstock in Crumb Cake to really give it an old-fashioned look. Not a lot of stamping, but I'm happy with the look...hope you like it as well!

Stamps: Engraved Greetings
Inks: Basic Black, Crumb Cake
CS: Very Vanilla, Basic Black, Riding Hood Red
Misc: Love Letter DSP, Word Window Punch, Ruby Red Mini Brads*, Paper Piercer & Template, Dimensionals, Sponge Dauber
*Retired

Thanks so much for stopping by today!


Sunday, April 3, 2011

Springtime Swap Card

Is Spring actually here? The calendar says it is...we had the threat of snow this past Friday, but it didn't really happen. Today is gorgeous.....in the 50's and somewhat sunny.....it's definitely promising! So, to celebrate Spring's arrival, I have a Springtime card for you.....I hosted a swap recently, and that was the theme....this was my submission.

If you look around in the stores at all the Spring clothes, jewel tones seem to dominate. So, I guess I'm right in line with this rather vivid card....the colors here are So Saffron, Pear Pizzaz, and Poppy Parade, with a touch of Basic Black and Whisper White. I'm in love with this combination!

This really was an easy card to put together and I'm thrilled with the end result. That center focal point was created with the fabulously wonderful 2 1/2" circle punch....it makes those big circles so easy! As you can see, I stamped on the white circle in Pear Pizzaz (I do believe it's my FAVORITE In-Color this year!!), and added in a couple of those cute little flowers, created with one of the shapes in the Itty Bitty Shapes Pack. And what says Spring better than butterflies? So, one of those adorable, tiny, little butterflies from the Beautiful Wings sizzlet was added for just the right touch. To create the scallop background behind the circle layers, I used my poor, neglected Flower Folds Bigz Die.....there are 2 put together. (The 2nd from the smallest was used.)

The ladies in the swap have not received this yet...but all the swaps are postal and on their way. Hope they like this one!

Stamps: Just Believe, Thank You Kindly, French Script
Inks: Pear Pizzaz, Basic Gray
CS: Whisper White, Poppy Parade, Pear Pizzaz, So Saffron, Basic Black
Big Shot: Square Lattice EF, Lots of Tags, Flower Folds Bigz Die, Beautiful Wings Sizzlet
Misc: 2 1/2" Circle Punch, Circle Scissor Plus, Wide Basic Black Grosgrain Ribbon, Paper Piercer, Dimensionals, Basic Pearls, Itty Bitty Shapes Pack


Thanks so much for stopping by!

Saturday, April 2, 2011

Let the Birds Sing!

Well, I know that I used this little stamp just last week for the Bloggers' Challenge, but it's just so dang cute...and I had not yet put it away. So, I figured I could use it again for this week's Challenge, which is BIRDS. SU has a ton of birds to choose from in their line...and I do have another to share in a day or so, but for the Challenge, this is it!

This layout was definitely inspired by the amazing Diana Gibbs,  (sorry....can't find a link to her original idea) but she made a square card...and although I like square cards, I simply do not make them....or send them!  So, I turned her idea into a regular size card. There are definitely some differences, a few less layers, different DSP, and then, of course, the bottom of the card......I had stamped in a greeting, which came out crooked and smudged, so I needed to cover it up and the scallop bottom idea was born!

This sample is totally current SU....I had considered using it for a stamp class I held last night, but decided about half way through that it might be too time consuming for my ladies. Since it's totally SU, the image was colored in using SU markers.  In my last post, I used Copics, and although I love using my Copics (my collection is quite small!), you can see that our markers work really well. I found a trick...color in using the lightest shade, highlight with a darker shade and then color over one more time with the lightest shade (see the tulips). By going over the area colored one last time with the lightest marker, it kind of smoothed out the rough edges and blended, or softened the colors. I believe the trick is to do each step, one right after another....in other words, don't let your project sit before continuing onto the next step. I guess the marker was maybe still a bit wet, or at least not totally cured.

So, what do you think? The tulips in the basket are more prominent that cute little blue bird.....does this qualify for our Challenge?

Stamps: A Flower for All Seasons, Tiny Tags
Inks: Jet Black StazOn, Pink Pirouette
CS: Whisper White, Pink Pirouette
Markers: Pink Pirouette, Pretty in Pink, Bashful Blue, Wild Wasabi, So Saffron, More Mustard Misc: Paper Piercer & Template, White Gel Pen, Pretty in Pink Grosgrain Ribbon, 2 3/8" Scallop Punch, 2 1/2" Circle Punch, Tasteful Trim Die, Lattice Die, Big Shot, Dimensionals , Designer Series Paper Pack-In Color

Thanks so much for stopping by and visiting today!

LinkWithin

Blog Widget by LinkWithin